Couple of months before, I was trying to install SQL 2005 in a new production machine, but middle of the installation received errors and failed with below error.
Error Message:
"Error 1053: The service did not respond to the start or control request in a timely fashion" error message when you stop or pause a managed Windows service.
Also, in the windows event log we had the same error “An unhandled win32 exception occurred in sqlservr.exe [3756]. Just-In-Time debugging this exception failed with the following error: Debugger could not be started because no user is logged on”.
Retried many times but no hope, finally I get throw this error. SQL server setup wont run smoothly, if the server has not 2n processors. I mean, we can install SQL server in 2, 4, 8, 16, 32, … 2n core processors. Machine which I was installing has 6 core processors.
Workaround
Change logical processor value to 1 and now we get throw this error.
Steps for changing logical processor count
1. Click Start, click Run, type msconfig, and then click OK
2. Click the BOOT.INI tab in the System Configuration Utility dialog box.
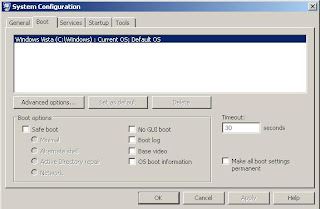
3. Now, click Advanced Options on the BOOT.INI tab
4. In the BOOT.INI Advanced Options dialog box, click to select the /NUMPROC= check box
5. In the list that is next to the /NUMPROC= check box, click 1, and then click OK
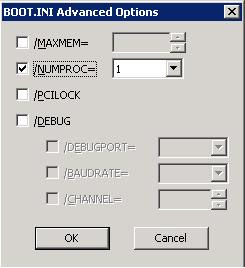
6. That’s it. Now SQL setup will run smoothly.
This bug has been resolved on SP 1, so if you integrate SP2 in SQL setup, you will win this mess.
Integrate SP2 with setup files
1. Copy setup files to local drive
2. Expand SQL Server 2005 SP2 or SP3 package in local drive by using the /X parameter.
SQLServer2005SP2-KB921896-x64-ENU.exe /X
913089 How to obtain the latest service pack for SQL Server 2005
3. Note the full paths to the new .msp files in the expanded update package. For example:
D:\temp\SP2\hotfixsql\files\sqlrun_sql.msp
4. At the command prompt, run the Setup.exe file from the release version by using the appropriate path to involve the new .msp file in the setup.
For example, the following command uses the update package to update the SQL Server Database Engine component to the service pack level:
D:\temp\Servers\setup.exe HOTFIXPATCH="D:\temp\SQL2005_12Procs\SP2\hotfixsql\files\sqlrun_sql.msp"
Note After you complete this step, the installation of SQL Server 2005 is in a configuration that is unsupported.
5. Apply the service pack package by running the hotfix.exe file in the expanded location. This step applies all service pack components and returns the installation of SQL Server 2005 to a supported state.
Saturday, January 9, 2010
Thursday, January 7, 2010
SQL 2008 – CHANGE TRACKING
1. Purpose of activity:
The Purpose of this activity is to improve technical knowledge in DBA team.
2. SQL 2008 – CHANGE TRACKING FEATURE
Change tracking is a new feature in SQL Server 2008 that allows applications to query for information about the changes that have been made to user tables since a previous point in time.
3. Enabling Change Tracking at the database level
a) Open the SQL Server Management Studio and connect to SQL Server 2008
b) Open Object Explorer and expand Databases.
c) Select the particular database where the change tracking needs to be enabled. Right click the database and select properties to launch the properties dialog.
d) Navigate to “Change Tracking” page and change the value of change tracking from false to true
e) Enter the required values for Retention Period, Retention Period Units and Auto Cleanup.
- Retention Period: Change information will be retained for atleast the time period that is specified by the retention period and retention period units.
- Retention Period Units: The units of the Retention Period Days or Months or Years.
- Auto Cleanup: Automatically clean up the change tracking information by using the specified retention period. If this value is false, change tracking information automatically continues to grow.
4. Enabling Change Tracking at the table level
a) Select the particular table where the change tracking needs to be enabled. Right click the table and select properties to launch the properties dialog.
b) Navigate to “Change Tracking” page and change the value of change tracking from false to true.
c) Enter the required value for the track columns updated field. This field is used to indicate the columns which are changed by UPDATE operation and also indicates that row has changed.
Note: Change tracking is supported only on the tables having primary key.
5. VIEW CHANGES & TSQL SCRIPTS
In order to find the rows changed on a table, we needs to use CHANGETABLE(CHANGES …)and CHANGE_TRACKING_CURRENT_VERSION().
TSQL SCRIPTS
DECLARE @sync_version int;
DECLARE @last_sync_version int;
SET @sync_version = CHANGE_TRACKING_CURRENT_VERSION();
– Obtain incremental changes using the sync version obtained last time
SELECT
P.,
CT.SYS_CHANGE_OPERATION, CT.SYS_CHANGE_COLUMNS, CT.SYS_CHANGE_CONTEXT
FROM
AS P
RIGHT OUTER JOIN
CHANGETABLE(CHANGES dbo.d, 0) AS CT
ON
P.c1 = CT.c1
CHANGETABLE() returns the table containg the below columns :
SYS_CHANGE_OPERATION – Type of DML operation on a row (ie I, U, D)
SYS_CHANGE_COLUMNS – Columns changed from a baseline version
SYS_CHANGE_CONTEXT – Optionally specified with the WITH clause
SYS_CHANGE_VERSION – Current change version associated with a row.
Note: we can only view changes through Query Analyzer. We can’t view in GUI mode.
Subscribe to:
Posts (Atom)