Thursday, September 16, 2010
Database Free Space Details
I was thinking to prepare this script and finally I did. This script will give database size and free space details.
SQL 2005 and 2008
create table #DBSpaceDetails (DBName nvarchar(150), Name nvarchar(100), PhysicalName nvarchar(1000), TotalSize bigint, FreeSpace bigint)
insert into #DBSpaceDetails (DBName, Name, PhysicalName, TotalSize, FreeSpace)
exec sp_msforeachdb 'use ?; SELECT db_name(), name, physical_name, size/128 AS ''TS (MB)'', size/128.0 - CAST(FILEPROPERTY(name, ''SpaceUsed'') AS int)/128.0 AS ''AS (MB)'' FROM sys.database_files'
select * from #DBSpaceDetails
Drop table #DBSpaceDetails
Note: size (8 KB page) is unit number and we need to convert this value to actual MB.
1024 KB = 1 MB
1 Unit = 8 KB
10 Unit = 1280 MB (ie 10 * 128 = 1280 MB; 1024/8 =128)
Script for SQL 2000
create table #DBSpaceDetails (DBName nvarchar(150), Name nvarchar(100), PhysicalName nvarchar(1000), TotalSize bigint, FreeSpace bigint)
insert into #DBSpaceDetails (DBName, Name, PhysicalName, TotalSize, FreeSpace)
exec sp_msforeachdb 'use ?; SELECT db_name(), name, filename, size/128 AS ''TS (MB)'', size/128.0 - CAST(FILEPROPERTY(name, ''SpaceUsed'') AS int)/128.0 AS ''AS (MB)'' FROM sysfiles'
select * from #DBSpaceDetails
Drop table #DBSpaceDetails
Output Result
Wednesday, August 25, 2010
Restore multiple data and log file script
Restore Script for existing database with same number Physical and logical files.
use mytestdb
select @sSQL = @sSQL + 'move ''' + name + ''' to ''' +physical_name+''', ' + char(13) from sys.database_files where TYPE =0
select @sSQL = @sSQL + char(13) + 'move ''' + name + ''' to ''' +physical_name+''','
set @sSQL = LEFT (@ssql, len(@ssql)-1)
Sample Result
restore database MyTestDB from disk ='h:\MyTestDB.bak'
with move 'MyTestDB_Data' to 'F:\SQL2005\SQLData\MyTestDB.mdf',
move 'MyTestDB0' to 'F:\SQL2005\SQLData\MyTestDB_1.ndf',
move 'MyTestDB1' to 'F:\SQL2005\SQLData\MyTestDB_2.ndf',
move 'MyTestDB2' to 'F:\SQL2005\SQLData\MyTestDB_3.ndf',
move 'MyTestDB3' to 'F:\SQL2005\SQLData\MyTestDB_4.ndf',
move 'MyTestDB4' to 'F:\SQL2005\SQLData\MyTestDB_5.ndf',
move 'MyTestDB5' to 'F:\SQL2005\SQLData\MyTestDB_6.ndf',
move 'MyTestDB6' to 'F:\SQL2005\SQLData\MyTestDB_7.ndf',
move 'MyTestDBIndex0' to 'F:\SQL2005\SQLData\MyTestDB_8.ndf',
move 'MyTestDBIndex1' to 'F:\SQL2005\SQLData\MyTestDB_9.ndf',
move 'MyTestDBIndex2' to 'F:\SQL2005\SQLData\MyTestDB_10.ndf',
move 'MyTestDB_Log' to 'G:\SQL2005\SQLLog\MyTestDB_Log.ldf'
Restore Script for fresh database.
Before execute below script, "Ad Hoc Distributed Queries" should be enabled else you will get below error.
SQL Server blocked access to STATEMENT 'OpenRowset/OpenDatasource' of component 'Ad Hoc Distributed Queries' because this component is turned off as part of the security configuration for this server. A system administrator can enable the use of 'Ad Hoc Distributed Queries' by using sp_configure. For more information about enabling 'Ad Hoc Distributed Queries', see "Surface Area Configuration" in SQL Server Books Online.
Msg 208, Level 16, State 1, Line 19
Invalid object name 'tempdb..tBakFileContent'.
sp_configure 'Ad Hoc Distributed Queries', 1
reconfigure with override
Declare @sTargetLogLocation varchar(5000)
Declare @sSQL varchar(8000)
Declare @sDBName varchar(1000)
set @sTargetDataLocation = 'D:\SQLData\'
set @sTargetLogLocation = 'L:\SQLLog\'
set @sDBName = 'MyTestDB'
select LogicalName, right(PhysicalName, CHARINDEX ( '\', REVERSE (PhysicalName),1)-1 )PhyName , Type
into tempdb..tBakFileContent
from
openrowset('SQLNCLI', 'server=SQLServer01\inst1;Trusted_Connection=yes;',
'SET FMTONLY off
exec (''restore filelistonly from disk =''''h:\MyTestDB.bak'''''')')as a
set @sSQL ='restore database ' + @sDBName + ' from disk =''h:\MyTestDB.bak'' ' + char(13) + 'with '
select @sSQL = @sSQL + 'move ''' + LogicalName + ''' to ''' +@sTargetDataLocation+ PhyName+''', ' + char(13)
from tempdb..tBakFileContent where TYPE ='D'
select @sSQL = @sSQL + char(13) + 'move ''' + LogicalName + ''' to ''' +@sTargetLogLocation+ PhyName+''','
from tempdb..tBakFileContent where TYPE ='L'
set @sSQL = LEFT (@ssql, len(@ssql)-1)
select @sSQL
Monday, August 2, 2010
SQL 2008 R2 Setup Error -'' is not a valid login or you do not have permission.
The following error has occured:
'' is not a valid login or you do not have permission.
This error occurs when system name and login names are same. My laptop and login names are same.
This error occurs after adding my login accounts in "Specify SQL Server administrators" on "Database Engine Configuration" tab.
How to get rid this error?
We can achieve this goal using 2 methods.
1. Login in two another windows login account and install.
2. Do not add your account and add another account which name is differ from system. I have used VM.
I have tried both methods and succeeded.
Sunday, June 13, 2010
SQL 2000 to SQL 2008 Upgrade
So, I had upgraded SQL 2000 to 2005 without any issues and was trying to upgrade SQL 2005 to 2008 but setup closed once support file installation completed.
Setup closed after setup support file so I had installed setup support file from SP1. First we need to extract setup file using below statement.
Extract Command
SQLServer2008SP1-KB968369-x86-ENU.exe /x:T:\SP1
Once extracted, just run support setup file which is located in below mentioned path.
SP1\x64\setup\1033\sqlsupport.msi
Now setup moved to next step. But middle of the setup I got below error.
Error
The specified local group already exists. (Exception from HRESULT:0x80070563)
Click 'Retry' to retry the failed action, or click 'Cancel' to cancel this action and continue setup.
I just pressed 'Cancel' and continue the setup but setup finished incompletely. I had tried setup repair option but same error.
What is the issue?. Setup was trying to re create the local Windows SQL related groups but failed. I removed below mentioned groups in Windows group.
SQLServerFDHostUser$wilsqlp11$MSSQLSERVER
SQLServerMSSQLUser$wilsqlp11$MSSQLSERVER
SQLServerSQLAgentUser$WILSQLP11$MSSQLSERVER
Restarted the repair activity, now I got the error "No mapping between account names and security IDs was done". Setup was trying to map previously created Local groups to SQL server but failed. Pressed 'Cancel' button and continue the setup. Few times, the error was appeared. Finally upgrade completed successfully. Windows local groups were created automatically.
Friday, June 11, 2010
SSIS Package Issues in SQL 2008
As per Microsoft recommendation, SSIS service should not be in cluster resource but we can add resource.
After installation, i had faced the below issues.
Issue 1
failed to retrieve data for this request. microsoft.sqlserver.management.sdk.sfc
After installation, i had faced issues while trying to connect the SSIS package in cluster environment.
By default, SSIS package is always trying to connect the default instance in the node. I had cluster environment so we need to modify configuration file in SSIS package configuration file.
you may also get below errors
Failed to retrieve data for this request. (Microsoft.SqlServer.SmoEnum)
The SQL Server specified in Integration Services service configuration is not present or is not available. This might occur when there is no default instance of SQL Server on the computer. For more information, see the topic "Configuring the Integration Services Service" in SQL Server 2008 Books Online.
Login Timeout Expired
An error has occurred while establishing a connection to the server. When connecting to SQL Server 2008, this failure may be caused by the fact that under the default settings SQL Server does not allow remote connections.
Named Pipes Provider: Could not open a connection to SQL Server [2]. (MsDtsSvr).
Solution
1. Navigate this location \Program Files\Microsoft SQL Server\100\DTS\Binn\
2. Edit MsDtsSrvr.ini.xml in notepad and change server name "." to Cluster name.
< xsd="http://www.w3.org/2001/XMLSchema" xsi="http://www.w3.org/2001/XMLSchema-instance">
<>true < /stopexecutingpackagesonshutdown>
<>
< type="SqlServerFolder">
<>MSDB < /name>
<>ServerName\InstanceName < /servername>
< /folder>
< type="FileSystemFolder">
<>File System < /name>
<>..\Packages < /storepath>
< /folder>
< /toplevelfolders>
< /dtsserviceconfiguration>
3. Save XML file and restart SSIS service
Issue 2
"Connect to SSIS Service on machine failed: Access is denied"
While trying to connect the SSIS package from client machine. I can able to connect the SSIS service in node.
We need to add below steps in Local group policy and windows component service.
1. Add users in Distributed COM local windows Users group
2. Start -> Run -> %windir%\system32\Com\comexp.msc to launch Component Services
or program files -> Administrative tools -> Component Services
3. Expend Component Services\Computers\My Computer\DCOM Config
4. Right click on MsDtsServer node and select properties
5. Navigate Security page menu
6. Click Edit button in “Launch and Activation Permissions” section.
7. Add users and provide all permissions. Press ok to complete.
8. Click Edit button on “Launch Permissions” section
9. Add users and provide all permissions. Press ok to complete.
10. Restart SSIS Service
Wednesday, June 2, 2010
Cluster service failed to start local system account
Could not start the Cluster Service service on Local Computer.
Error 1314: A required privilege is not held by the client.
Solution If we want to run cluster service under domain account or local admin group, service account should be added in below locations.
Open Local Security Policy on Administrator group and configure below locations.
Local Security Policy\Security Settings\Local Policies\User Rights Assignment
* Act as part of the operating system
* Adjust memory quotas for a process
* Back up files and directories
* Increase scheduling priorities
* Log on as a service
* Restore files and directories
* Debug programs
* Impersonate a client after authentication
* Manage auditing and security log
This solution is applicable for windows 2003 server. Refer other version on below link
http://support.microsoft.com/default.aspx?scid=kb;en-us;Q269229
Tuesday, May 25, 2010
SQL 2008 Upgrade in Cluster Environment Setup Issue
SQL 2005 to SQL 2008 upgraded in cluster environment is very very interesting and fantastic. Yes, it is really amazing. There are no downtime required for SQL 2008 upgrade. Start upgraded from passive mode and finally move active node to passive node and upgrade. For example environment has 3 cluster node with named clusa, clusb, clusc nodes. clusa is active remaining are passive node. Apply upgrade in passive node one by one. Setup wont upgrade all instances simultaneously. during this upgraded SQL server is online and running with SQL 2005 version. Once upgraded is completed in passive node than move cluster resources to passive node. Now you will the big surprise, yes... SQL server is running in clusb with SQL 2008 version. Finally upgrade SQL 2008 on clusa.
Error Message
Cannot execute a program. The command being executed as "c:\WINDOWS\microsoft.NET\Framework\v2.0.50727\csc.exe" /noconfig /fullpaths @"c:\Documents and Settings sqlservices\Local settings\Temp\hin6evfc.cmdline".
Resolution
IIS admin service is bloking .NET freamwork installation. Just stop IIS admin service in service control manager. Now SQL 2008 upgrade will run without any issues.
Saturday, January 9, 2010
SQL Server 2005 Installation Troubleshoot
Error Message:
"Error 1053: The service did not respond to the start or control request in a timely fashion" error message when you stop or pause a managed Windows service.
Also, in the windows event log we had the same error “An unhandled win32 exception occurred in sqlservr.exe [3756]. Just-In-Time debugging this exception failed with the following error: Debugger could not be started because no user is logged on”.
Retried many times but no hope, finally I get throw this error. SQL server setup wont run smoothly, if the server has not 2n processors. I mean, we can install SQL server in 2, 4, 8, 16, 32, … 2n core processors. Machine which I was installing has 6 core processors.
Workaround
Change logical processor value to 1 and now we get throw this error.
Steps for changing logical processor count
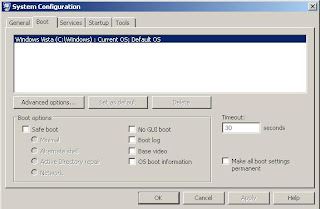
1. Click Start, click Run, type msconfig, and then click OK
2. Click the BOOT.INI tab in the System Configuration Utility dialog box.
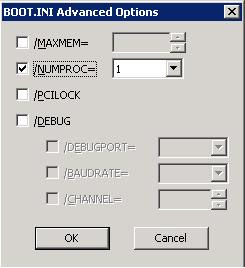
3. Now, click Advanced Options on the BOOT.INI tab
4. In the BOOT.INI Advanced Options dialog box, click to select the /NUMPROC= check box
5. In the list that is next to the /NUMPROC= check box, click 1, and then click OK
6. That’s it. Now SQL setup will run smoothly.
This bug has been resolved on SP 1, so if you integrate SP2 in SQL setup, you will win this mess.
Integrate SP2 with setup files
1. Copy setup files to local drive
2. Expand SQL Server 2005 SP2 or SP3 package in local drive by using the /X parameter.
SQLServer2005SP2-KB921896-x64-ENU.exe /X
913089 How to obtain the latest service pack for SQL Server 2005
3. Note the full paths to the new .msp files in the expanded update package. For example:
D:\temp\SP2\hotfixsql\files\sqlrun_sql.msp
4. At the command prompt, run the Setup.exe file from the release version by using the appropriate path to involve the new .msp file in the setup.
For example, the following command uses the update package to update the SQL Server Database Engine component to the service pack level:
D:\temp\Servers\setup.exe HOTFIXPATCH="D:\temp\SQL2005_12Procs\SP2\hotfixsql\files\sqlrun_sql.msp"
Note After you complete this step, the installation of SQL Server 2005 is in a configuration that is unsupported.
5. Apply the service pack package by running the hotfix.exe file in the expanded location. This step applies all service pack components and returns the installation of SQL Server 2005 to a supported state.
Thursday, January 7, 2010
SQL 2008 – CHANGE TRACKING
The Purpose of this activity is to improve technical knowledge in DBA team.
2. SQL 2008 – CHANGE TRACKING FEATURE
Change tracking is a new feature in SQL Server 2008 that allows applications to query for information about the changes that have been made to user tables since a previous point in time.
3. Enabling Change Tracking at the database level
a) Open the SQL Server Management Studio and connect to SQL Server 2008
b) Open Object Explorer and expand Databases.
c) Select the particular database where the change tracking needs to be enabled. Right click the database and select properties to launch the properties dialog.
d) Navigate to “Change Tracking” page and change the value of change tracking from false to true
e) Enter the required values for Retention Period, Retention Period Units and Auto Cleanup.
- Retention Period: Change information will be retained for atleast the time period that is specified by the retention period and retention period units.
- Retention Period Units: The units of the Retention Period Days or Months or Years.
- Auto Cleanup: Automatically clean up the change tracking information by using the specified retention period. If this value is false, change tracking information automatically continues to grow.
4. Enabling Change Tracking at the table level
a) Select the particular table where the change tracking needs to be enabled. Right click the table and select properties to launch the properties dialog.
b) Navigate to “Change Tracking” page and change the value of change tracking from false to true.
c) Enter the required value for the track columns updated field. This field is used to indicate the columns which are changed by UPDATE operation and also indicates that row has changed.
Note: Change tracking is supported only on the tables having primary key.
5. VIEW CHANGES & TSQL SCRIPTS
In order to find the rows changed on a table, we needs to use CHANGETABLE(CHANGES …)and CHANGE_TRACKING_CURRENT_VERSION().
TSQL SCRIPTS
DECLARE @sync_version int;
DECLARE @last_sync_version int;
SET @sync_version = CHANGE_TRACKING_CURRENT_VERSION();
– Obtain incremental changes using the sync version obtained last time
SELECT
P.,
CT.SYS_CHANGE_OPERATION, CT.SYS_CHANGE_COLUMNS, CT.SYS_CHANGE_CONTEXT
FROM
AS P
RIGHT OUTER JOIN
CHANGETABLE(CHANGES dbo.d, 0) AS CT
ON
P.c1 = CT.c1
CHANGETABLE() returns the table containg the below columns :
SYS_CHANGE_OPERATION – Type of DML operation on a row (ie I, U, D)
SYS_CHANGE_COLUMNS – Columns changed from a baseline version
SYS_CHANGE_CONTEXT – Optionally specified with the WITH clause
SYS_CHANGE_VERSION – Current change version associated with a row.
Note: we can only view changes through Query Analyzer. We can’t view in GUI mode.